
A developer's guide to lift-and-shift cloud migration
Introduction
With the growing adoption of cloud models, many organizations are seeking ways to move to cloud-native development. New applications can be developed entirely using cloud models and services, exploiting microservices, autonomous development teams, agile and continuous deployment, and Kubernetes cloud deployments. Unfortunately, completely rewriting all legacy applications is seldom feasible due to the required time and cost.
To remain agile and competitive, organizations must migrate and modernize existing JavaTM apps and adopt cloud-native development. For most companies, this process involves reusing existing functionality and data as much as possible, moving existing workloads to a modern deployment platform, and finally applying new processes, products, and technology.
The “lift-and-shift” modernization model is an attractive first step to cloud-native development, involving:
- Containerizing existing monolithic workloads.
- Deploying the workload on a Platform-as-a-Service (PaaS).
- Keeping external integrations and data on the legacy platform.
Once those steps are accomplished, developers can begin to “strangle the monolith” to incrementally replace select in-app functionality with microservices.
This guide covers the lift-and-shift process using Red Hat® software, detailed in Figure 1 below, involving:
- Analyzing an existing monolithic application using Red Hat Application Migration Toolkit and migrating to open, standard interfaces.
- Updating the code and configuration to run on Red Hat JBoss® Enterprise Application Platform.
- Deploying the monolith as a container on Red Hat OpenShift® Container Platform where features like automatic scaling, integrated clustering, and failover can enhance the application.

After the application is deployed to Red Hat OpenShift Container Platform, additional tools can be used to convert specific functionality to microservices. This process can be used to break functionality into smaller pieces for greater parallelization and autonomy, adding a focus on reducing time to value using tools such as:
Simplify migration with Red Hat Application Migration Toolkit
Red Hat Application Migration Toolkit is an extensible and customizable rule-based tool that helps simplify the migration of Java applications. It is used by organizations for:
- Planning and work estimation.
- Identifying migration issues and suggesting solutions.
- Evaluating detailed reports.
- Using built-in rules and migration paths.
- Providing rule extension and customizability.
- Analyzing source code or application archives.
Red Hat Application Migration Toolkit looks for common resources and highlights technologies and known trouble spots when migrating applications. The toolkit provides a high-level view into the technologies used by the application, and offers a detailed report that organizations can use to estimate, document, and migrate Java EE applications to Red Hat JBoss Enterprise Application Platform.
Note: Red Hat Application Migration Toolkit is typically only part of a larger application migration and modernization program. These programs are usually comprised of well-defined and repeatable phases over weeks or months, and can involve many people from a given organization.
Analyze a Java EE app
Red Hat Application Migration Toolkit examines application artifacts, including project source directories and application archives. It then produces an HTML report that highlights areas needing changes. The toolkit can be used to migrate Java applications from previous versions of Red Hat JBoss (EAP) or from other application server platforms, such as Oracle WebLogic Server or IBM® WebSphere Application Server.
Red Hat Application Migration Toolkit can be installed and used in a few different ways:
- Web console. The web console for Red Hat Application Migration Toolkit allows a team of developers to assess and prioritize migration and modernization efforts for a large number of applications. It allows you to group applications into projects for analysis, and it provides numerous reports that highlight the results.
- Command line interface (CLI). The CLI is a command-line tool that allows developers to assess and prioritize migration and modernization efforts for applications. It provides numerous reports that highlight the results of the analysis. The simplicity of the CLI makes it ideal for analyzing a single application.
- Eclipse plugin. The Eclipse plugin for Red Hat Application Migration Toolkit provides assistance directly in Eclipse and Red Hat OpenShift Dev Spaces for developers making changes for a migration or modernization effort. It analyzes your projects using Red Hat Application Migration Toolkit, marks migration issues in the source code, provides guidance to fix the issues, and offers automatic code replacement when possible.
All of these access methods can be downloaded from the Red Hat Application Migration Toolkit page. For multi-user scenarios, the web console is a good option. This document references the CLI for simplicity. The steps that follow summarize operation of Red Hat Application Migration Toolkit.
1. Verify the Red Hat Application Migration Toolkit CLI
Once the Red Hat Application Migration Toolkit CLI is has been installed, verify that the tool was installed properly by running:
$ ${HOME}/rhamt-cli-4.0.0.Beta4/bin/rhamt-cli --version
You should see something similar to the following:
    Using RHAMT at /root/rhamt-cli-4.0.0.Beta4

    > Red Hat Application Migration Toolkit (RHAMT) CLI, version 4.0.0.Beta4.
2. Run the Red Hat Application Migration Toolkit CLI against your project
The Red Hat Application Migration Toolkit CLI has a number of options to control how it runs. Here the CLI is used to run against a project called monolith, generating a report by the same name. Substitute ~/projects/monolith below with the name of your actual project under study.
    $ ~/rhamt-cli-4.0.0.Beta4/bin/rhamt-cli \

      --sourcemode \

      --input ~/projects/monolith \

      --output ~/rhamt-reports/monolith \

      --overwrite \

      --source weblogic \

      --target eap:7 \

      --packages com.redhat weblogic
Note the use of the --source and --target options. These options allow you to target specific migration paths supported by Red Hat Application Migration Toolkit. Migration paths include:
- Oracle WebLogic Server
- IBM WebSphere Application Server
- Red Hat JBoss EAP 5/6/7
Wait for the toolkit run to complete before continuing. When complete, you should see something similar to:
Report created: ~/rhamt-reports/monolith/index.html
3. View the results
To view the report, direct your local browser at the following file:
~/rhamt-reports/monolith/index.html
You should see the landing page for the report as shown in Figure 2. The main report landing page lists the applications that were processed, along with issues that were encountered. Each row on the page contains a high-level overview of the story points, the number of incidents, and the technologies encountered in the application.

In this example, clicking on the monolith link accesses a dashboard for the project as shown in Figure 3.

Understand the report
The dashboard gives an overview of the entire application migration effort. It summarizes:
- The incidents and story points by category.
- The incidents and story points by level of effort of the suggested changes.
- The incidents by package.
Note: Story points are an abstract metric commonly used in Agile software development to estimate the relative level of effort needed to implement a feature or change. Red Hat Application Migration Toolkit uses story points to express the level of effort needed to migrate particular application constructs—and the application as a whole. The level of effort will vary greatly depending on the size and complexity of the application(s) to migrate.
There are several other sub-pages accessible from the menu near the top.
- All Applications provides a list of all of the applications scanned.
- Dashboard gives an overview for a specific application.
- Issues summarizes all issues that require attention.
- Application Details provides a detailed overview of all resources found within the application that may need attention during the migration.
- Unparsable shows all the files that Red Hat Application Migration Toolkit could not parse in the expected format. For instance, a file with a .xml or .wsdl suffix is assumed to be an XML file. If the XML parser fails, the issue is reported in this section and also where the individual file is listed.
- Dependencies displays all Java-packaged dependencies found within the application.
- Remote Services shows all remote services references that were found within the application.
- EJBs contains a list of Enterprise Java Beans found within the application.
- JBPM lists all of the Java Business Process Management-related resources that were discovered during analysis.
- JPA contains details on all Java Persistence application programming interface (API)-related resources that were found in the application.
- About describes the current version of Red Hat Application Migration Toolkit and provides helpful links for further assistance.
Note: Some of the above sections may not appear depending on what actual issues were detected in the project.
Now that the Red Hat Application Migration Toolkit report is available, you can begin migrating the app.
Address issues
The Issues Report tab in Figure 4 provides a more detailed listing of all of the known issues with the application under study. It lists helpful links so users can understand the issue more deeply and offers migration and modernization guidance.

Many applications will have platform-specific code that needs to be updated to use standard Java EE interfaces, including:
- Startup code to perform functions or schedule jobs upon starting or stopping the app.
- Logging code using platform-specific logging functions.
- Messaging code using obsolete or platform-specific mechanisms. In each case, the Issues Report will suggest possible solutions.
In the real world, addressing some of these issues may require additional thought as part of the migration. However, implementing these changes makes the code much more portable.
After necessary changes have been made, Maven can be used to build and package the app to make sure the changed code still compiles:
$ mvn clean package
If the code builds successfully (displaying BUILD SUCCESS), you will be able to move on to the next issue in the Issues Report. Re-test the build Once all of the issues have been addressed, Red Hat Application Migration Toolkit is run again to verify that the migration was successful.
1. Run the Red Hat Application Migration Toolkit CLI against the project
Run the command below to clean the old build artifacts, re-execute the Red Hat Application Migration Toolkit CLI, and analyze the new project. Again, substitute the location of your project for ~/projects/monolith.
   $ mvn clean && \

   ~/rhamt-cli-4.0.0.Beta4/bin/rhamt-cli \

     --sourceMode \

     --input ~/projects/monolith \

     --output ~/rhamt-reports/monolith \

     --overwrite \

     --source weblogic \

     --target eap:7 \

     --packages com.redhat weblogic
Once the process completes, the CLI should display:
Report created: /root/rhamt-reports/monolith/index.html
2. View the results
Reload the local report web page at:
~/rhamt-reports/monolith/index.html
After successful migration, the corresponding application should report zero (0) story points, indicating that the app has been successfully modernized, and is now ready to be moved to Red Hat JBoss EAP.

Run the project in Red Hat JBoss Enterprise Application Platform
Now that the app has been updated to use more standard Java EE interfaces, you can deploy it, test it, and start to explore some of the features offered by Red Hat JBoss EAP.
Install Red Hat JBoss Enterprise Application Platform
Download the latest release of Red Hat JBoss EAP. Then install Red Hat JBoss EAP locally by running the following command in the terminal window. Adjust the file name to match the downloaded version.
$ unzip -d $HOME $HOME/jboss-eap-7.2.0.zip
Next, set the JBOSS_HOME environment variable:
$ export JBOSS_HOME=$HOME/jboss-eap-7.2.0
That is how easy it is to install Red Hat JBoss EAP.
The WildFly Maven Plugin
Red Hat JBoss EAP provides a wildfly-maven-plugin tool that can stop, start, deploy, and configure the platform directly from Apache Maven. After the maven-plugin tool is configured, it can be used to:
- Choose between full Java EE or the Java EE Web Profile.
- Configure database resources.
- Configure services such as Java Message Service Topic.
All of these capabilities are configured in the pom.xml file.
Configure the application
After using Red Hat Application Migration Toolkit, the application is largely standards-based. It can be configured by launching Red Hat JBoss EAP to start, add resources, and shut down the application, as follows:
   $ export JBOSS_HOME=$HOME/jboss-eap-7.2.0 ; \ mvn wildfly:start wildfly:
    add-resource wildfly:shutdown
This step should terminate with a BUILD SUCCESS message.
Note: The reason we are using wildfly:start and wildfly:shutdown is because the add-resource command requires a running application server. After we have added this resource we do not need to run this command again.
Deploy the application
You are now ready to deploy the application:
$ export JBOSS_HOME=$HOME/jboss-eap-7.2.0 ; mvn wildfly:run
Once the server starts, it should display:
Deployed “ROOT.war” (runtime-name: “ROOT.war”)
Test the application
Access the application by loading the following URL into your browser:
http://localhost:8080
Any warnings will appear in the console output.
Shut down the application
Before moving on, terminate the application by typing CTRL-C in the terminal window.
Deploy the monolith to Red Hat OpenShift Platform
Once the application is up and running in Red Hat JBoss EAP, you can move the newly updated monolith to Red Hat OpenShift Container Platform. The following steps assume access to a Red Hat OpenShift Container Platform cluster. If you do not have access to a cluster, you can install Red Hat OpenShift Container Platform locally.
Add a Red Hat OpenShift profile Open the pom.xml file and add a Red Hat OpenShift profile.

First, open the Red Hat OpenShift Container Platform web console.
Create a Red Hat OpenShift project

Login using your Red Hat OpenShift credentials:
- Username: XXXXXX
- Password: XXXXXX
You will see the Red Hat OpenShift Container Platform landing page:

Click Create Project, fill in the fields, and click Create. In this example, the application is called “coolstore.”
- Name: coolstore-dev
- Display Name: Coolstore Monolith - Dev
- Description: leave this field empty

Click on the name of the newly created project:
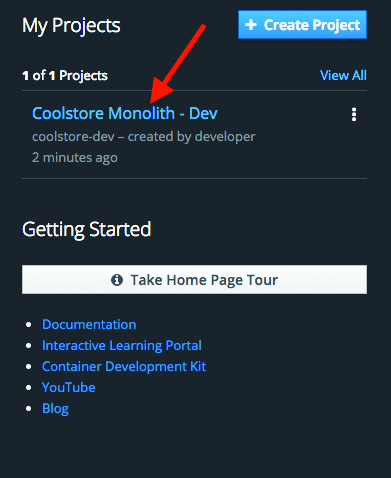
This will take you to the project overview. There is nothing there yet, but that is about to change.
Deploy the monolith
Use the CLI to deploy the components of the monolith. To deploy the monolith template using the CLI, execute the commands below.
First, switch to the developer project you created earlier:
$ oc project coolstore-dev
And finally deploy template:
$ oc new-app coolstore-monolith-binary-build
This step will deploy any databases required by the application as well as Red Hat JBoss EAP, but it will not start a build for the application.
Next, open the Monolith Overview page at:
https://$OPENSHIFT_MASTER/console/project/coolstore-dev/ and verify the monolith template items are created.

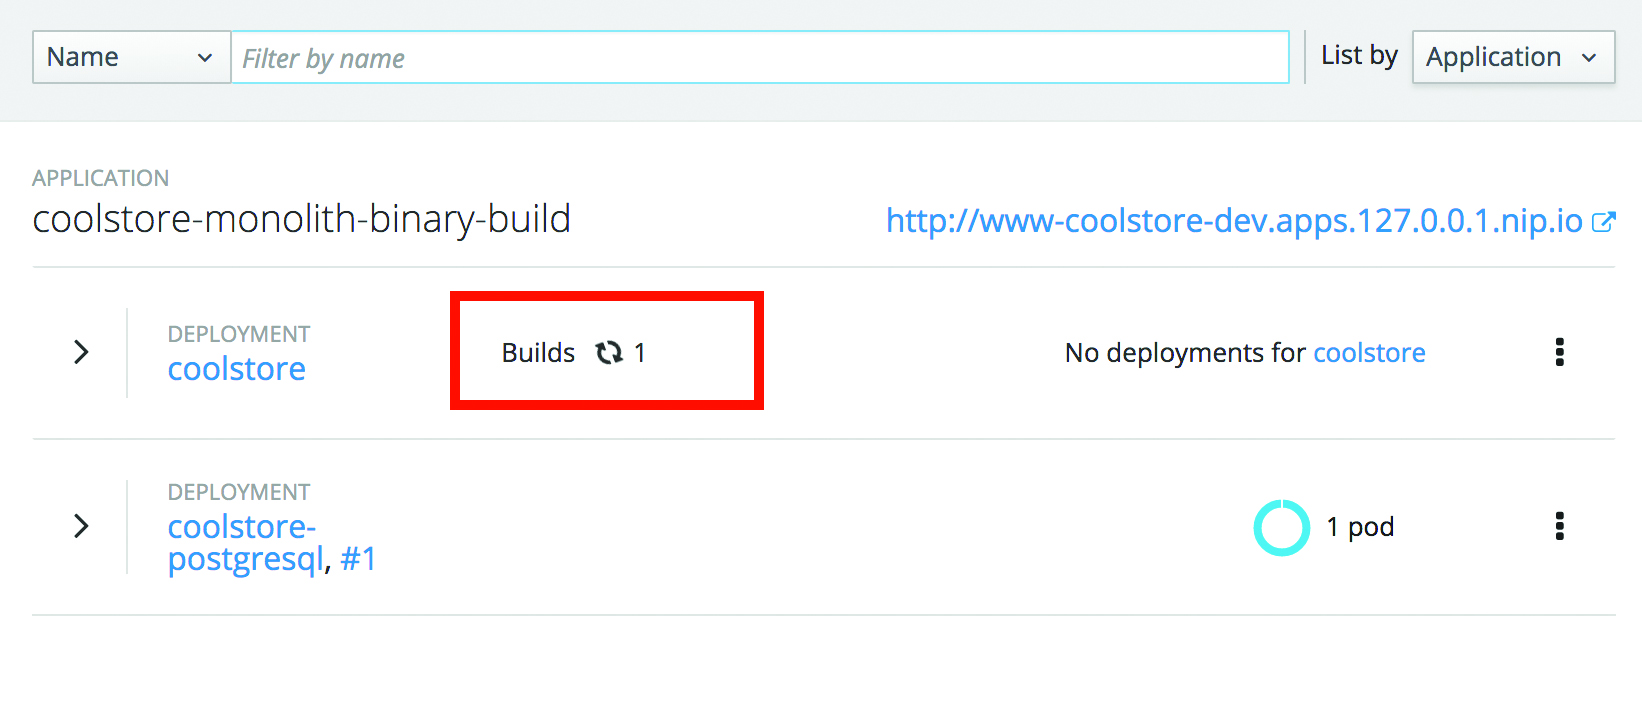
You can see the components being deployed on the Project Overview, but notice that there are “No deployments for coolstore.” You have not yet deployed the container image built in previous steps, but you will do that next.
Deploy the application using Binary Build
In this development project, we have selected to use a process called binary builds. This process builds locally and just uploads the artifact (e.g. the .war file) instead of pointing to a public Git repository and having the source-to-image (S2I) build process download, build, and then create a container image for us. The binary deployment will speed up the build process significantly.
First, build the project once more using the openshift Maven profile, which will create a suitable binary for use with Red Hat OpenShift Container Platform (this is not a container image yet, but just the .war file). We will build the project with the oc command line.
Build the project:
$ mvn clean package -Popenshift
Wait for the build to finish and the BUILD SUCCESS message.
Finally, start the build process that will take the .war file, combine it with Red Hat JBoss EAP, and produce a Linux® container image. That image will be automatically deployed into the project, thanks to the DeploymentConfig object created from the template:
$ oc start-build coolstore --from-file=deployments/ROOT.war
Check the Red Hat OpenShift web console, and you should see the application being built. In this case, a PostgresSQL database has already been deployed.
Wait for the build and deploy to complete:
$ oc rollout status -w dc/coolstore
This command will be used often to wait for deployments to complete. Be sure it returns success when you use it. You should eventually see:
replication controller “coolstore-1” successfully rolled out.
Note: If the above command reports Error from server (ServerTimeout) then simply re-run the command until it reports success.
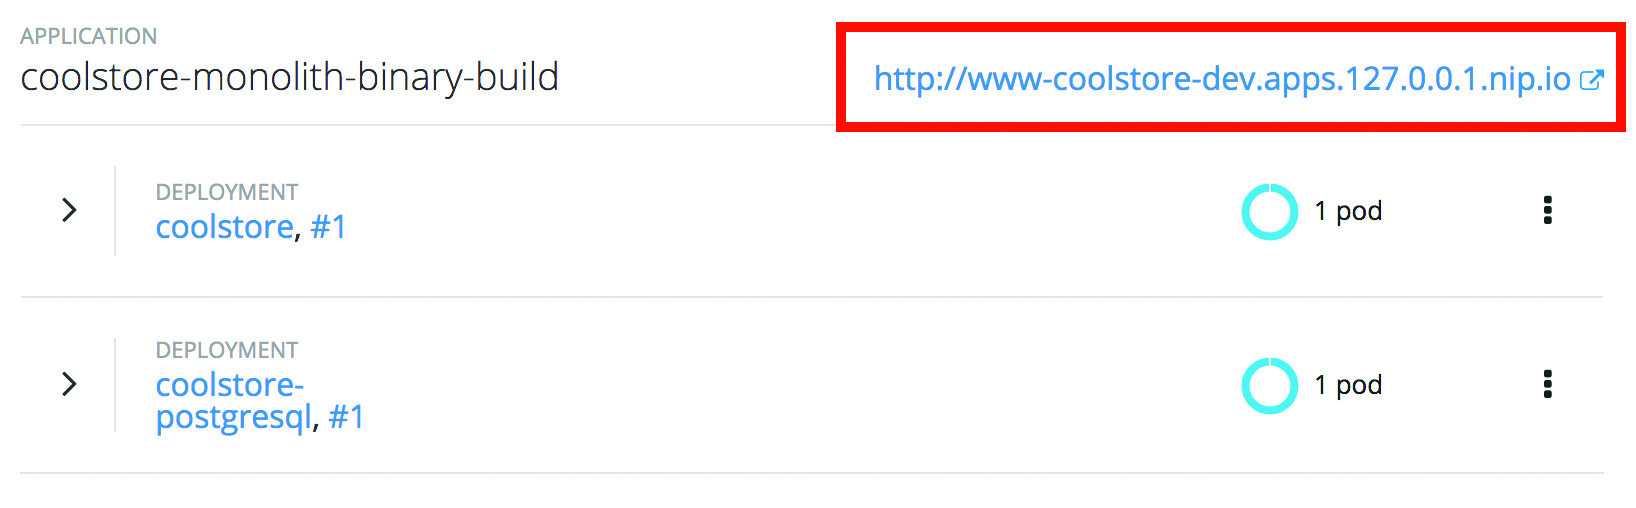
When the process is complete, you should see the application deployed successfully with blue circles for the database and the monolith:

Test the application by clicking on the Route link at:
http://www-coolstore-dev.$ROUTE_SUFFIX, which will open the coolstore monolith in your browser, this time running on Red Hat OpenShift Container Platform.
Summary
This process has demonstrated how to migrate an existing Java EE app to the cloud with Red Hat JBoss Enterprise Application Platform and Red Hat OpenShift Container Platform. Now you are ready to start modernizing the application by breaking the monolith into smaller microservices in incremental steps, while employing modern techniques to ensure the application runs well in a distributed and containerized environment.